
Leather Edge Finishing: Burnishing vs. Paint
A project can be cut cleanly, stitched straight, and made from beautiful leather, but a rough edge can still make the whole thing feel unfinished.
That does not mean every edge needs to be glossy or painted. Some projects look best with a clean raw edge. Others need to be folded, bound, burnished, or coated. The right choice depends on the leather, the construction, and the look you are trying to achieve.
For most handmade leather goods, the two most common finished-edge methods are burnishing and edge painting.
Burnishing compresses and polishes the exposed fibers. It works best on firm vegetable-tanned leather and some other dense leathers that hold together under friction.
Edge paint builds a flexible coating over the cut edge. It is commonly used on chrome-tanned leather, softer bag leather, watch straps, luxury goods, and layered constructions where the edge needs a smooth, uniform appearance.
The finish itself is only the last part of the job. Most edge problems begin earlier, with an uneven cut, poorly aligned layers, rough sanding, or too much product applied too quickly.
This guide walks through the preparation, tools, and basic steps behind both methods.
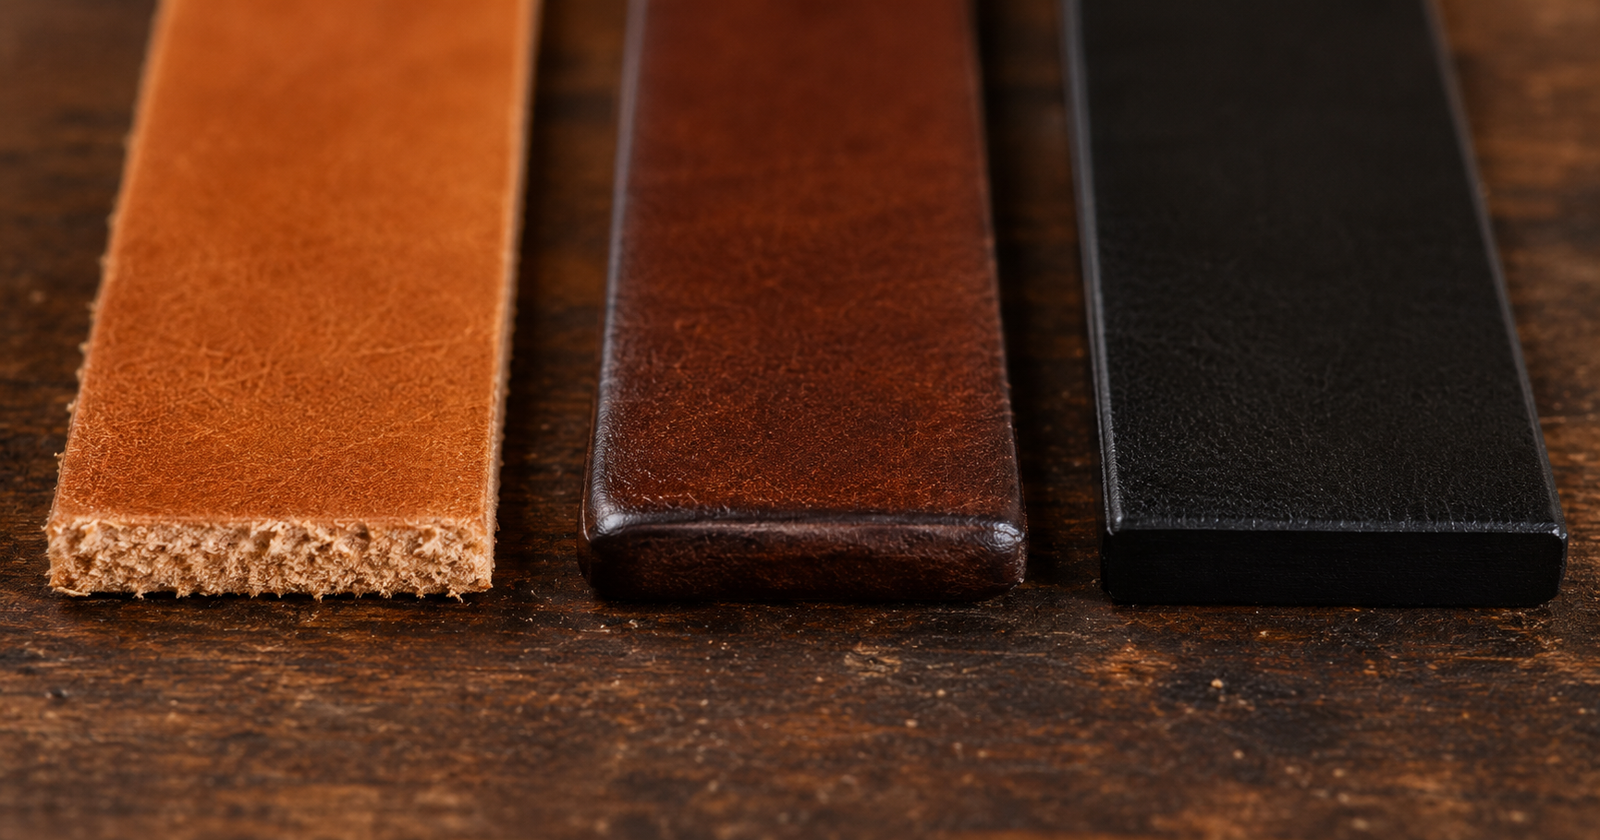
Three ways to treat a cut leather edge. Left: raw and unsanded. Center: burnished veg tan. Right: edge painted. The method you choose depends on the leather and the look you are after.
A Clean Edge Starts Before the Finish
The most important rule: Burnishing compound and edge paint will not hide a poor cut. The layers need to be aligned, the edge needs to be even, and the surface needs to be prepared before the finish goes on.
If two or more pieces are being glued together, get the alignment as close as you can before pressing them down. Once the adhesive has set, trim or sand the layers until they read as one continuous edge.
Some makers cut every piece to its final size first and align them carefully during glue-up. Others leave one or more layers slightly oversized, glue the assembly, and make a final trim cut afterward. Both methods can work. The important part is ending with a clean, even edge.
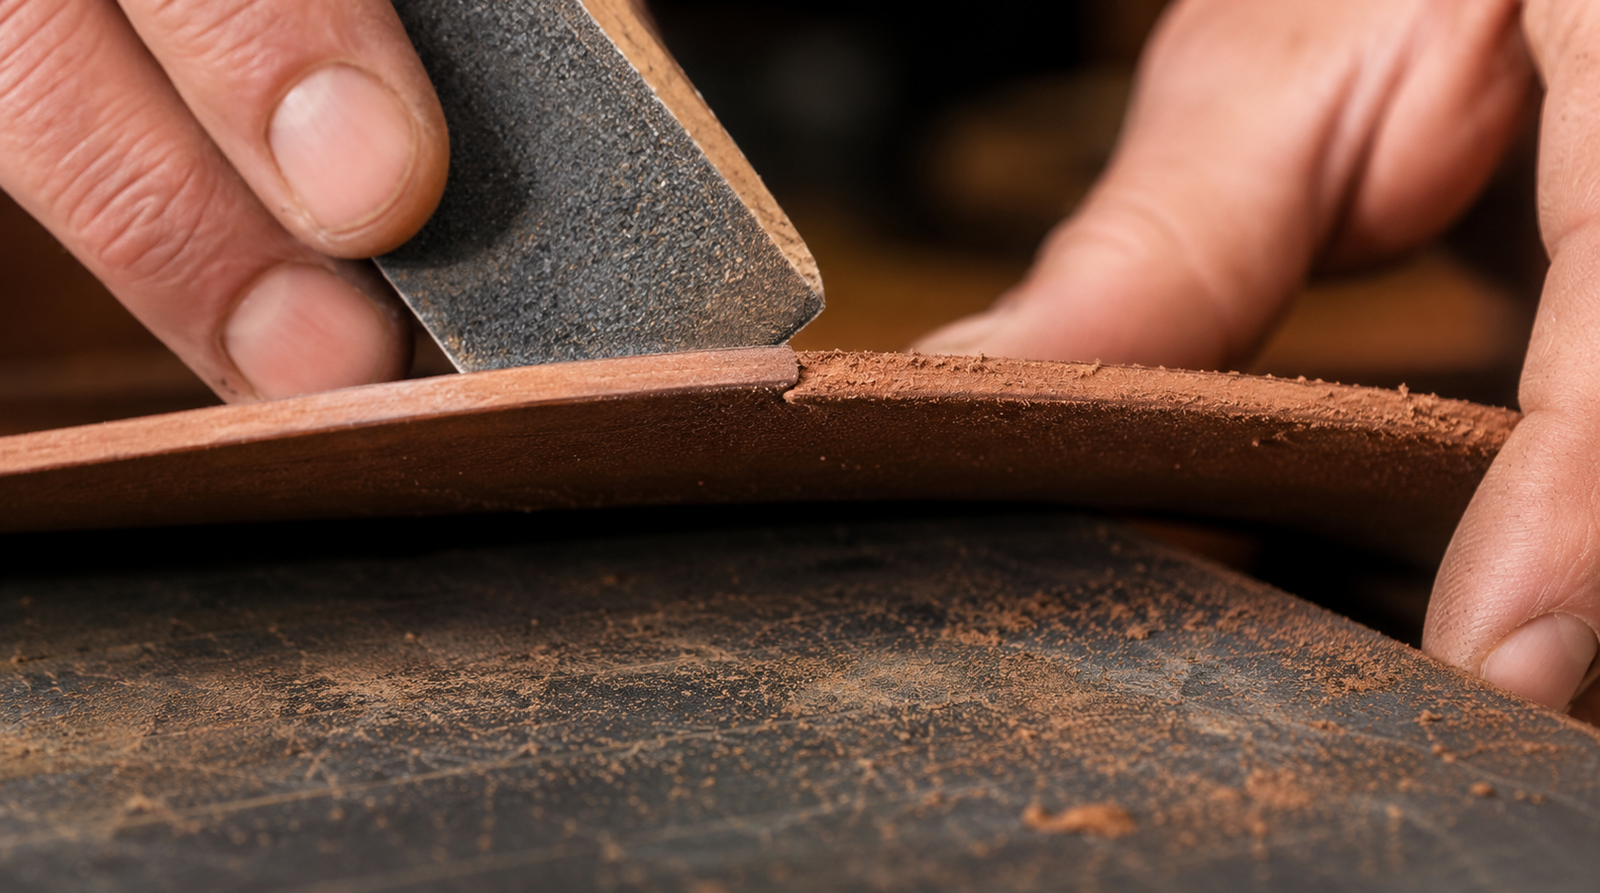
Preparation is the most important step. No amount of burnishing compound or edge paint will fix an edge that has not been sanded flush and even first.
Start sanding with a grit coarse enough to remove glue lines, bumps, and small overhangs. Then move through finer grits until the edge feels smooth. Jumping straight to very fine sandpaper usually polishes the high spots while leaving the uneven areas behind.
For a burnished edge, beveling removes the sharp corners and gives the edge a rounded profile. For a painted edge, the amount of beveling depends on the look you want. Some painted edges are softly rounded, while others are kept flatter and more architectural.
Take your time here. A few extra minutes spent correcting the edge before finishing will save you from applying coat after coat over a shape that was wrong from the beginning.
How to Burnish Veg Tan Leather
Burnishing uses moisture, friction, and pressure to lay down and compress the exposed leather fibers. On the right leather, that rough cut edge gradually becomes darker, smoother, and more polished.
Firm vegetable-tanned leather is the easiest material to burnish well. Some combination-tanned and dense leathers can also respond nicely. Soft chrome tan usually does not compress the same way and may stay fuzzy, stretch, or roll under the slicker.
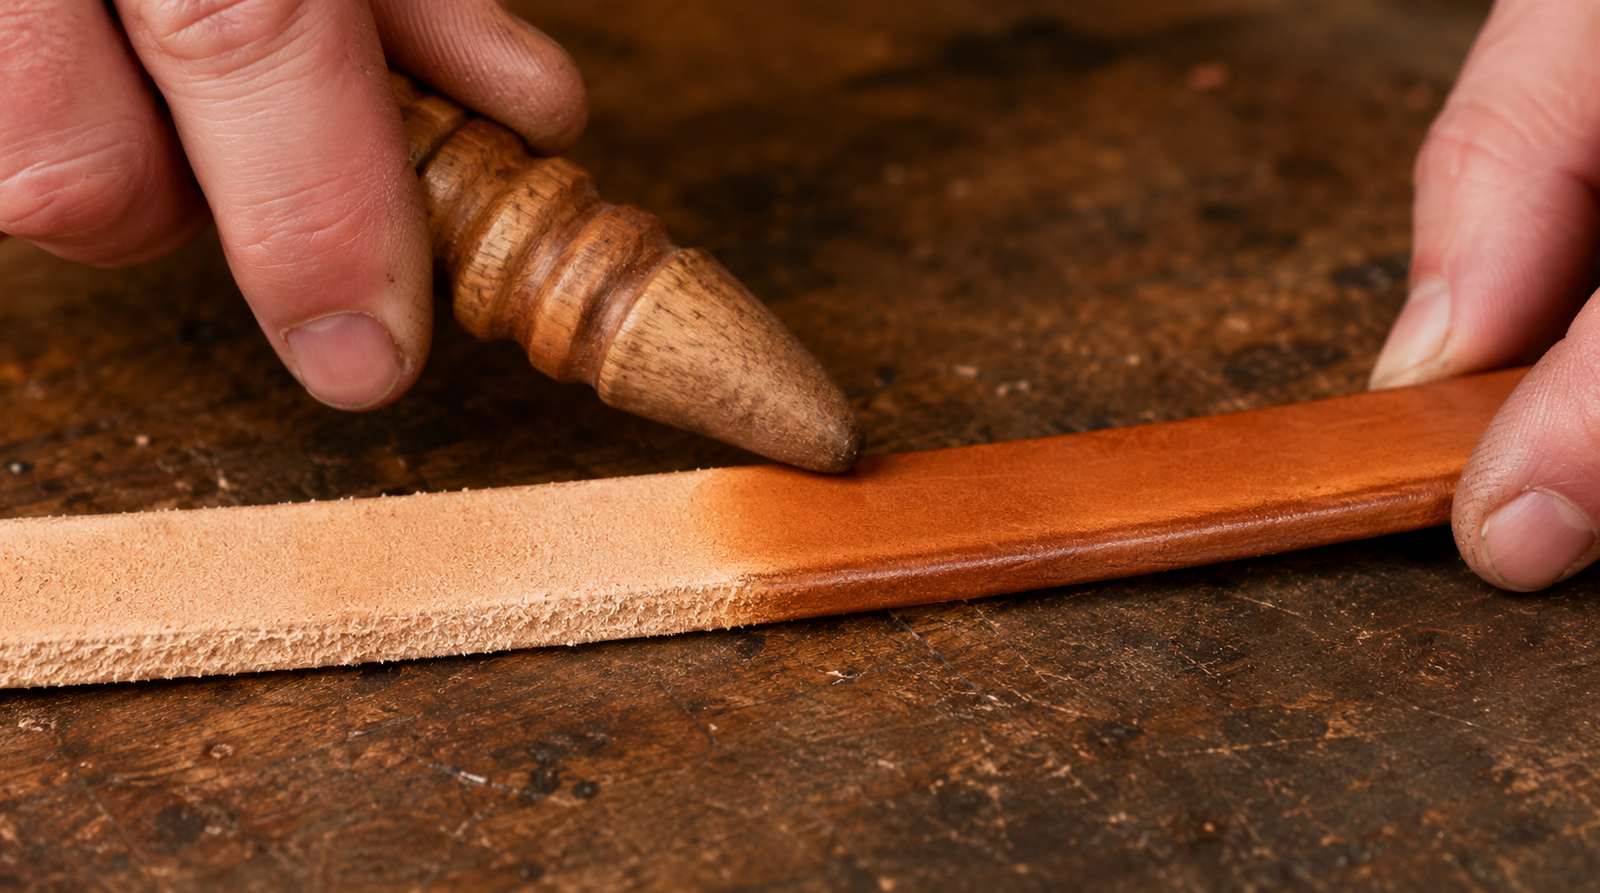
A wooden slicker creates friction that compresses and polishes the exposed leather fibers. The transition from raw to burnished is visible along the length of the strap.
1. Sand the edge smooth
Remove glue lines, uneven layers, and deep tool marks before adding water or compound. Work through progressively finer grits until the edge feels even under your fingertip.
2. Bevel the corners
Use an edge beveler that matches the leather thickness. The goal is to remove the sharp corner, not carve away half the edge.
3. Apply a small amount of moisture or compound
Water, saddle soap, gum tragacanth, Tokonole, and similar products can all help. Use less than you think you need. A soaked edge becomes soft and difficult to control.
4. Create friction
Rub the edge with canvas, denim, wood, glass, or another burnishing tool. Use quick, controlled passes. Heavy pressure can deform the edge, especially on lighter leather.
5. Let the edge settle
If the fibers begin lifting again, allow the edge to dry, sand lightly, and repeat. A good burnish often comes from several restrained passes rather than one aggressive session.
6. Add wax if the project calls for it
Beeswax, paraffin, or a dedicated edge wax can add protection and help produce a final polish. Apply a thin coat and buff away the excess.
How to Apply Edge Paint
Edge paint creates a flexible coating over the cut edge rather than polishing the exposed fibers themselves.
It is especially useful on chrome-tanned leather, soft bag leather, watch straps, layered goods, and projects where a clean, uniform color is part of the design.
Good painted edges are built slowly. The smooth finish comes from preparation, thin coats, drying time, and sanding between layers. One heavy coat usually creates ridges, bubbles, and soft spots.
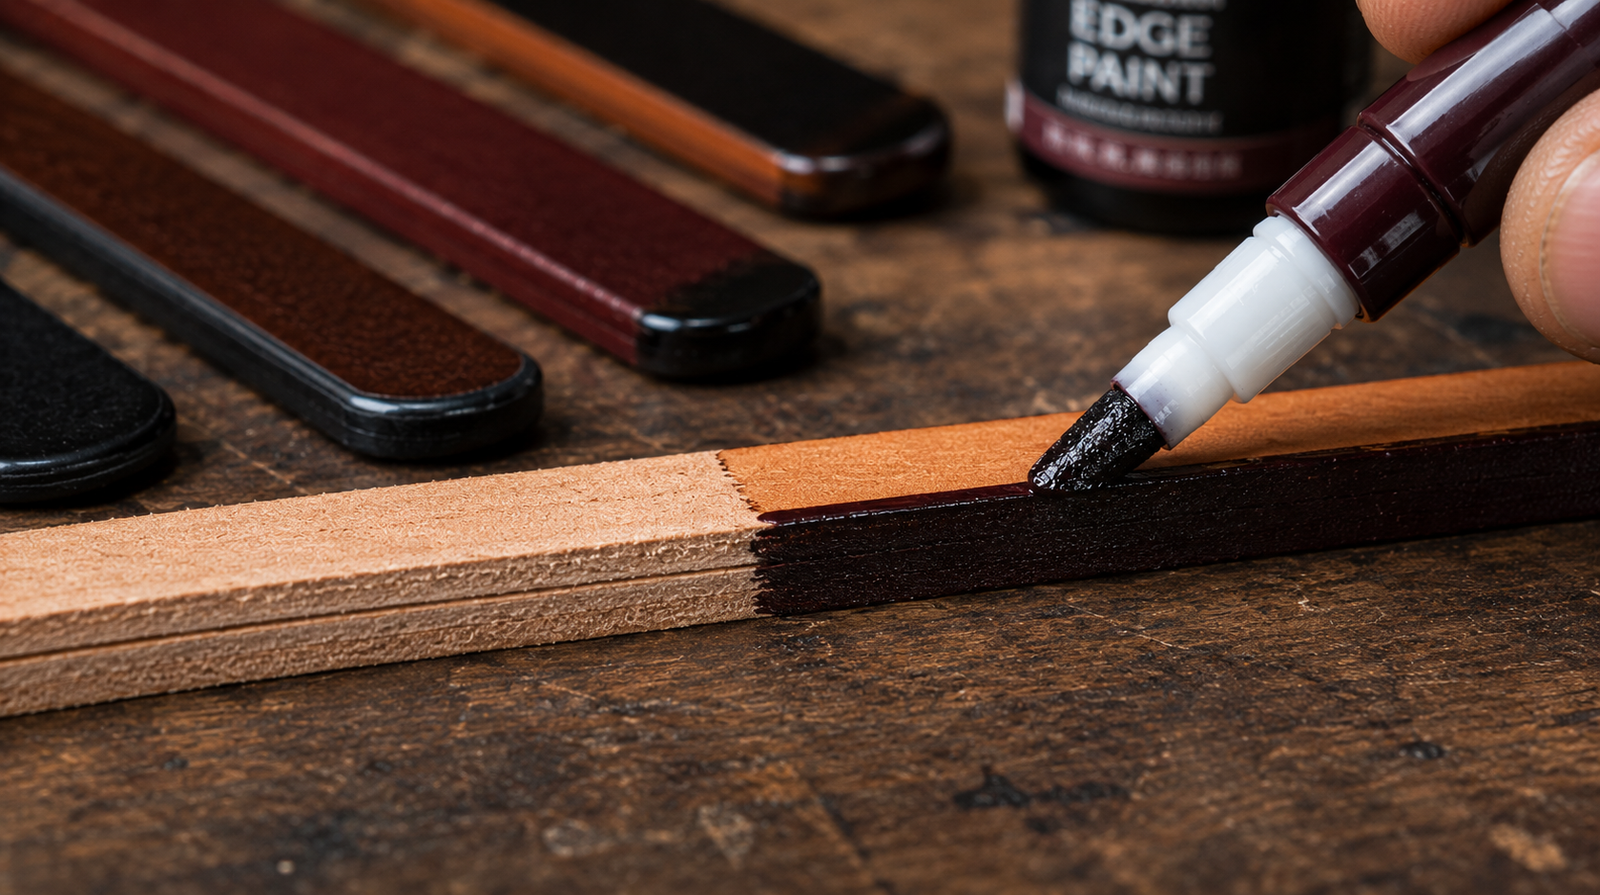
Edge paint is applied in thin coats with a roller pen or applicator. The finished samples in the background show the range of colors and the clean uniform finish that multiple thin coats can achieve.
1. Prepare the edge
Align the layers, trim or sand them flush, and remove loose fibers. Depending on the paint system, you may also use a primer or base coat.
2. Apply a thin first coat
Use a roller pen, edge applicator, awl, brush, or machine applicator. Keep the coat narrow and even. Avoid flooding the corners or letting paint spill onto the face of the leather.
3. Let it dry fully
Drying time matters. Sanding paint that is dry on the surface but still soft underneath can pull, tear, or smear the coating.
4. Sand lightly
Use fine sandpaper to remove high spots, ridges, and dust. The goal is to level the coat, not sand all the way back to bare leather.
5. Repeat as needed
Most clean painted edges require several thin layers. Two coats may be enough for a simple project. A more refined edge may take three or four coats, especially on stacked leather.
6. Finish the final surface
Depending on the product, the final coat may be left as applied, lightly polished, heated with a suitable tool, or covered with a clear topcoat. Follow the paint manufacturer’s instructions before applying heat.
Common Edge-Finishing Mistakes
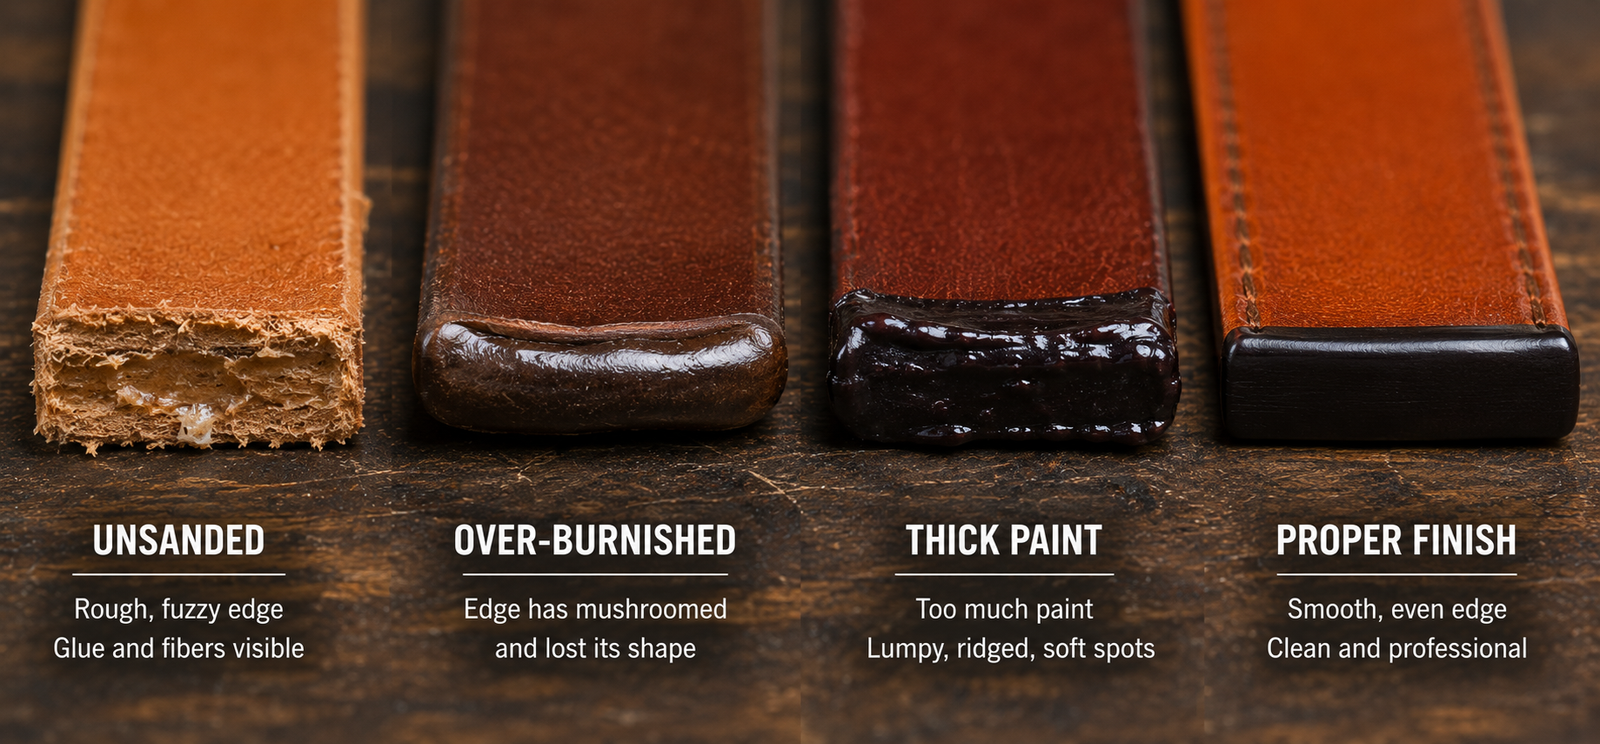
Four common outcomes. From left: unsanded, over-burnished, too much paint in one coat, and a properly finished edge. The difference between the first three and the last one is mostly patience and prep.
Applying finish before the edge is level
Burnishing and paint both follow the shape underneath them. If the edge is wavy, stepped, or covered in dried glue, the finish will show it.
Using too much water or compound
More product does not create a faster burnish. Too much moisture can soften the edge, swell the fibers, and make the leather difficult to shape cleanly.
Pressing too hard
Burnishing requires friction, but heavy pressure can flatten, roll, or mushroom the edge. Let speed and repetition do more of the work.
Skipping sanding between coats
Edge paint builds on whatever surface is below it. If one coat has ridges or debris, the next coat preserves them.
Applying one thick coat of edge paint
Heavy coats dry unevenly and are more likely to sag, crack, or remain soft underneath. Several thin layers are slower but far easier to control.
Expecting every leather to finish the same way
A firm veg tan, soft chrome tan, oily pull-up, suede split, and heavily finished upholstery leather will all respond differently. Test the finish on scrap from the same hide before committing to the final piece.
Where to Buy Edge-Finishing Supplies
Edge finishing does not require a bench full of expensive tools, but the right materials make the process easier.
A basic setup may include sandpaper, an edge beveler, canvas, a slicker, burnishing compound, wax, edge paint, and a simple applicator. What you need depends on the leather and the finish you prefer.
Our supplier directory includes sellers for leather, edge tools, compounds, paint, applicators, hardware, and other bench supplies. Use it to compare selection, pricing, shipping, and the kinds of tools each supplier handles best.